
This renovation has been a long learning curve to say the least and part of the learning has been working out what are really the “must have beginner tools” for a first-time DIYer on a budget, what you need them for and how to use them.
My grandfather was a brilliant carpenter, working mostly furniture and finer carpentry, he’d built a shed at the bottom of his garden: “The Hut” where he’d work, after school I used to go and see what he was working on (what I’d give for just 1 day working along side him now I’ve developed my own interest in DIY & woodworking!!). Back then I had no idea what he was doing or what all the tools he had did and that’s how it felt starting out on a massive renovation with basically zero knowledge of DIY, you see all these tools but have no idea what they are, why you might need them and what they can be used for.
Now into my 5th year of basically non-stop renovation work I’ve worked out what the “must have” woodworking tools for beginners actually are, so in this post I’m going to run you through the things you need to consider before buying, give an honest review of what beginner tools first time DIYers really need and also outline what my beginner toolkit might look like and the costs involved.
What beginner tools do you really need?
There is no set answer to this because in my view it depends where you are and what material(s) you are primarily working with. Let me explain, this something I never batted an eyelid at before we did our renovation but that now fascinates me. This is probably an overgeneralisation & pretty obvious when you start to consider it but when you renovate an old house you’ll start to realise the materials used to build it are very much (completely) decided by location and what natural materials where available at the time locally.
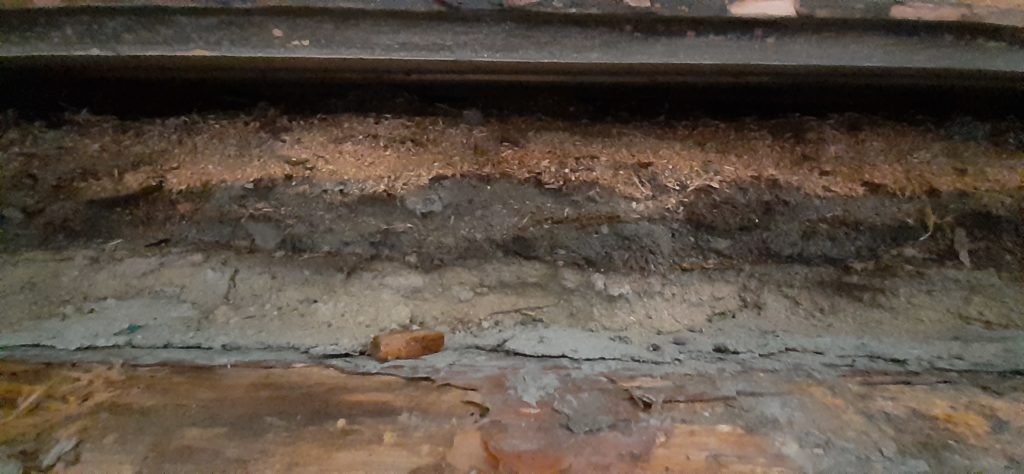
For our house in northern Sweden which was built in the late 1800s wood was the primary material available to build with so our house is 99.9% wood with some stone around the foundation (and other natural materials like blue clay, moss, wood chipping), whereas if we take France or the UK a lot of older houses are built primarily with stone & mortar with wooden roof structures. Location used to determine materials available, you couldn’t order online and ship in that marble kitchen top from Italy for example, you made do with what you had around you, I love this idea and we try to follow this with our house where possible, reusing existing materials & techniques where we can, a form of regenerative building I guess.
So to bring this back to my original statement. When our house was built, wood was the primary building material so I’m primarily working with wood materials and therefore my tool kit reflects this.
As I said this is a big overgeneralisation because I doubt you’d find too many houses in the World which don’t have some wood in their construction (perhaps an apartment though) but hopefully it helps you understand your own needs better which will in turn let you understand what tools you really do need for your DIY or renovation work.
Considering your primary working material(s) will hopefully mean you’re not just buying tools you’ll never need or use but another factor to consider is your current projects or planned projects and let your projects determine which tools you really need. For example, there’s no point buying a tile cutter if you have absolutely no immediate plans for laying tiles.
So in short, let the primary materials you’ll be working with and your projects be the primary consideration in what beginner tools you need.
Borrow before you buy!
When we started this renovation I had zero tools outside of a basic toolkit which was my wife’s, we’d lived in apartments and minus putting the odd picture on the wall I had absolutely no use for power tools.
So when our renovation kicked off I started out borrowing tools from friends and family, a miter saw, a circular saw, crowbars, nail guns, you name it I borrowed it! This was mainly with money saving in mind but what this actually did as well as save money was let me figure out what tools and brands and features I needed & liked.
As the renovation went on I returned my loaned tools and bought my own with some valuable knowledge about how those tools worked and what I wanted when I bought my own.
In all honesty I got pretty far working primarily with wood with just these few basic loaned tools but they had to be returned at some point so buying was inevitable.
DIY Tools: Hire or Buy?
Like borrowing, hiring tools can also be a great way to save money & space for one-off or larger projects. In the past we’ve hired a mini digger, jack hammers and even a rotavator.
In my experience most rental companies are primarily there to rent out larger tools & equipment to other companies (B2B) over longer periods and that’s where they make their money so I’ve found you can get some pretty good deals on rental equipment as a private personal. When we rented the mini-digger it cost about $200 for a whole weekend with delivery and picked up.
Space around our yard is vast but we have no significant storage so while buying a mini-digger for example would be a sound investment for the amount of use we’d get from it we simply have no where to store it or the knowledge to maintain it so owning one isn’t really an option, not to mention the costs involved.
In general, if you’re going to need a smaller tool more than 2-3 times during a renovation and you have the budget it’s much better to just buy one than hire it as the cost of hiring multiple times will probably end up the same ot more than buying your own in the long run.
For larger tools and equipment the costs involved in buying is generally much more so you’d really need to use the tool a lot or even consider renting it out yourself to get your money back on it and therefore for larger more expensive tools & equipment it’s nearly always better to rent them.
Brand “lock in”
If you browse YouTube or Instagram for the best DIYers & professionals you might start to notice some people are what I call “locked in” to using one brand of power tool, this is normally due to preference because they’ve tried & tested lots of tools and brands or even because of sponsorship. As a beginner DIYer both of these things are pretty unlikely but you can still take advantage of “locking yourself” into one brand or a few brands if your preference is with battery powered tools.
It’s pretty simple, as I’ve mentioned before when you buy battery powered tools they often are sold without a battery or charger which can be misleading to start with (although it makes them slightly cheaper) but you can take advantage of this by buying a few batteries and a fast charger for a given brand then buying tools from the same brand that work with the batteries you have.
Flip it on it’s head, imagine buying 8 power tool from 8 different brands, you’ll have to buy 8 different batteries and 8 different chargers! It’ll likely cost you more and if you’re like me you’ll probably end up wasting time trying to find batteries & chargers!
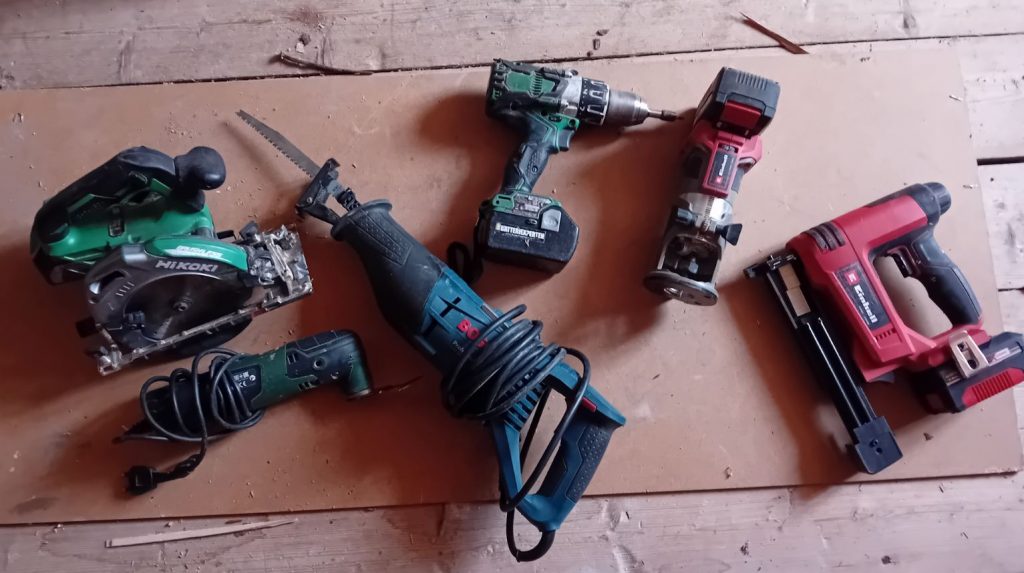
I’d highly recommend this, narrow down your favourite brand or brands and then get a set of batteries and charger and buy additional products from the same “family”. I’ve done this with my Einhell tools and my Hikoki tools, I’ve got multiple batteries and fast chargers for each brand and then a number of tools from each brand. Alternatively, you could buy a ready-made combo kit of power tools.
Buying established brands vs cheaper alternatives
In an ideal World you have an unlimited budget and can buy every Festools power tool that exists (they have really amazing professional level tools), but if like me you’re a DIYer on a budget it’s pretty hard to justify buying tools that can often cost 2-3 times more than other brands and maybe 4-5 times that of a builders merchants own brand in most cases. I am yet to buy a single Festools power tool for this reason despite many urges to do so and I find buying power tools on a budget is a bit of a balancing act, here’s the points I consider before buying a new tool in order to stay on budget (Disclaimer: I am tight with budgets, 4 years of renovation without loans & using wages & savings has made me that way!):
- How often am I going to use the given tool?
If it’s a tool like a screw driver or circular saw and you’re working mainly with wood you’ll see pretty quickly that you will use them in basically every project you do, with this is mind you want durable tools with good battery life & power so for tools you’ll use a lot I’d always suggest going with a known brand for the durability and look for brushless motors for better power and efficiency.
On the other hand, if you need a tool for a one off project or just a few projects a cheaper/simple builders merchants own brand will likely get the job done (or you could hire as I mentioned above). - Will my projects grind to halt if this tool breaks & I have to wait to get a new one?
Similar to point 1, you want durability in your tools so you’re not left hanging if they do pack up. Using the screw driver example (although they are readily available), if my screwdriver packed up and I had to wait a week for a new one, my projects would simple stop because I use it so often.
Also when you start out on a renovation or new build it’s hard to understand how “heavy” your project is if you have no prior experience. By “heavy” I mean how hard are your tools going to have to work & are they go to last. I did buy some cheaper tools at the start but it didn’t take long for example for me to see that a cheap, brush motor screwdriver was simply not going to stand up to screwing into 10cm thick high quality timber logs, it broke pretty fast and was essential money wasted. - Regardless of whether I will use the tool often will it save me significant time?
If you’re doing a full renovation or new build your time will become precious and above all low. All tools save you time but often the decision between a hand tool or power tool or a branded tool or a cheaper alternative can be a significant time saver that you should weigh up.
An example for me was this summer was when I had to make 2 wooden windows, I’d accepted I couldn’t justify buying a proper joiner (because of budget & space) so I decided to do it primarily with the tools I already had (table saw & hand routers) but as I was reusing old floorboards which needed working down I decided to invest in an auto-feeding planer/thicknesser so I could straighten & thin down the wood much much faster than doing each piece with a table saw & then hand planing. Although I’ve not used the planer since (I will though) I saved a massive amount of time so believe it was 100% worth the investment even in a tool I won’t use that often. - Do I actually have the budget to buy the tool or will it mean taking money from something else?
And sometimes it’s just pure maths when you’re doing a bigger project or renovation, if I spend X on a new tool will it affect the overall project. Example being buying a new expensive saw and then not having the budget to buy the wood for a stud wall.
Sticking to these principles despite being incredibly boring has helped keep us on budget throughout our 4+ years of renovation.
One additional thing to note when choosing between known brands and builders merchant own brands is accessories and replacement parts. If you own a known brand power tool you will often find it a lot easier to find compatible accessories and replacement parts than you will if you go for a builders merchant own brand.
As an example, take an oscillating saw (more on that in a bit) which is designed to support a whole array different types of attachments, Bosch for example make both the tools and the attachments and their attachments are also compatible with many other known brands whereas a less known brands are unlikely to be (although they might work if you try). You’ll still be able to find attachments/replacements for less known brands but it will probably just be limited to online.
Where to buy DIY tools & material?
As much as I like to buy local & support local businesses for me in Sweden the local DIY shops just simply aren’t competitive when it comes to price or selection of tools so I regularly buy my power tools online instead.
For smaller tools & materials I do buy from locally builders merchants as well as all wood we’ve used, 80-90% of which has come from local businesses in the town nearby and I always reuse existing materials where possible since the quality of old wood for example if often significantly better quality than wood from larger builders merchant.
5 things to look for when buying DIY tools online
- Best price: goes without saying, you want the best price and don’t be surprised if you see the exact same product $40-50 cheaper from one website to the next or even on the same website if you shop on larger sites like Amazon.
- Find products in stock for quick delivery: Once I’ve order somethings I want it NOW! so I always make sure I only buy products that are in stock & available for immediate shipping. If you do this you’ll probably find your orders being delivered within 3-4 days, some orders I’ve made from within Sweden and from Amazon EU I’ve received within 24 hours!!!
- At least a 30 day return policy: if you change your mind or find a better price nearly all online stores allow “no questions asked” return policy from 14-30 days, I’ve also found some bigger chains having up to 1 year return policy!! This assumes the product is unused and it most cases still in the box it came in.
- Buy in your region: You might be buying globally so make sure that the products are suitable to your region both in terms of safety standards & with power tools that the electric plugs fit!!
- Do your research: when I realised I need a new DIY tool I tend to head straight over to YouTube and see how people use the tool in question and try to find some honest reviews of the products. A lot of products review can just be advertising so bare that in mind & try to find reviews of multiple similar tools in one video then they tend to be a bit more subjective and then if you have a brand or tool in mind you can see how it compares to similar tools from different brands.
Look for “Amazon’s Choice” products
Amazon is a great place to buy DIY tools from because they excel in points 1, 2, 3 & 4 above and that’s why I promote and buy Amazon products myself. When browsing products on Amazon look for the “Amazon’s Choice” tag because this highlights products that are: high rated (based on customer reviews), well priced products and that are available for immediate shipping which is exactly what you want!!
Basic beginner tools starter kit
The main point I’ve tried to make so far in this post is, when you start out with DIY or renovation or new builds, if you keep your primary material(s) in mind & not look too far passed your next project you don’t need to spend a fortune on a vast amount of tools and power tools.
You can often get by with a pretty minimal set of DIY tools to start with which can grown organically over time, for general DIY and woodworking a basic starter toolkit might look something like this (costs are estimates):
1) A general toolbox: $50 – 100
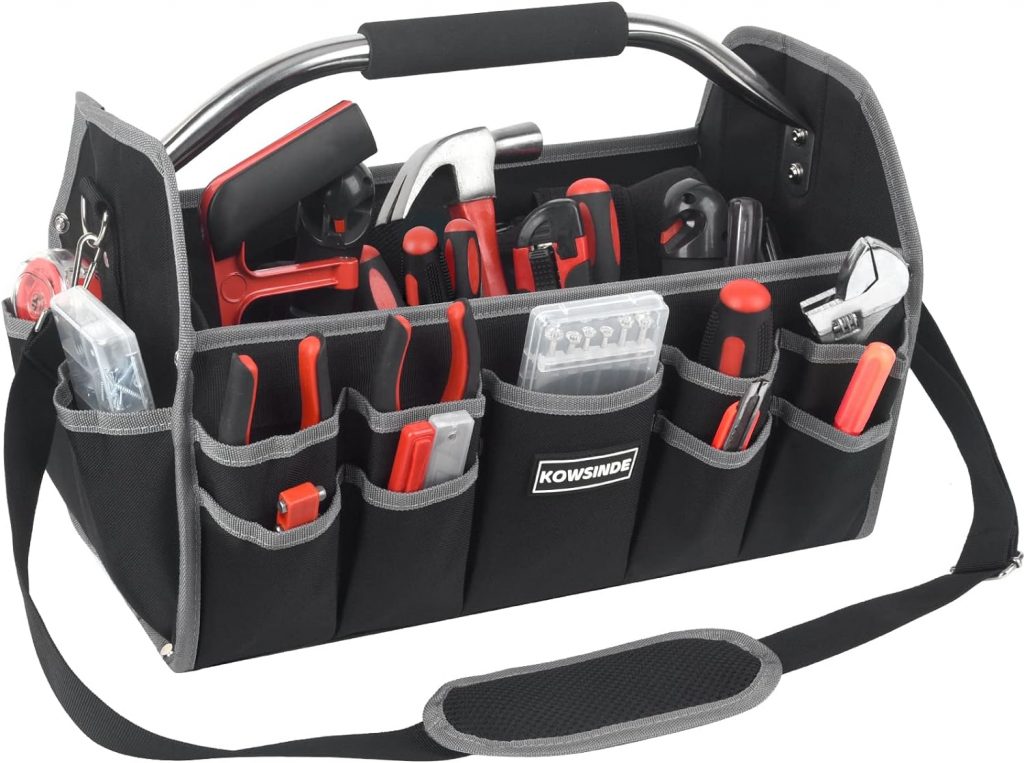
You can pick these up at any DIY shop or online, a toolbox or case with hand screwdrivers, screw heads, a hammer and often some spanners. Add to this some good chisels, some builders knives (if you’re like me you’ll loose them regularly), a half decent axe & a hand saw if you’re working with wood often, a spirit level or laser level, some pencils and a couple of tape measures and you’ve got most basic stuff covered.
It’ll also give you something to carry smaller tools in which if you’re moving around can be very helpful or just to keep things organised, the amount of time I spend looking for smaller tools that “I had a moment ago” but put down is not even funny!
2) Battery driven brushless screw or impact driver: $200 – 300
A brushless screwdriver or impact driver is well worth spending some money on because you will use it all the time! I have a Hikoki brushless screw driver which is a respected brand and is very durable, I use it for drilling (wood & even concrete), screwing screws, mixing clay & mortar and even wallpaper plaster, it’s a real beast of a screwdriver which does mean it weighs a fair bit but I can live with that for the power.
I’ll save this the impact driver vs screw driver & brush vs brushless discussion for another post but in short, brushless motors mean more power/torque & better efficiency so despite the added cost they are in my view worth it and I would actual not recommend a brush motor screwdriver for anything more than very basic DIY work.
As for impact driver vs screw driver, an impact driver offers more power from it’s “knocking” effect which is better for working with harder materials & if you need to screw in really long screws. I however, have had zero problems with hard woods or long screws with my Hikoki screw driver, it will literally screw right through basically any wood and keep going if I allow it to!
My screwdriver didn’t come with a battery or charger so I invested in 2 batteries and a fast charger which I would highly recommend, that way you have 1 battery in use and 1 can be charged, with a fast charger you can charge up in minutes rather than hours!
Maintenance on a screw driver like this other than charging batteries is basically zero too!
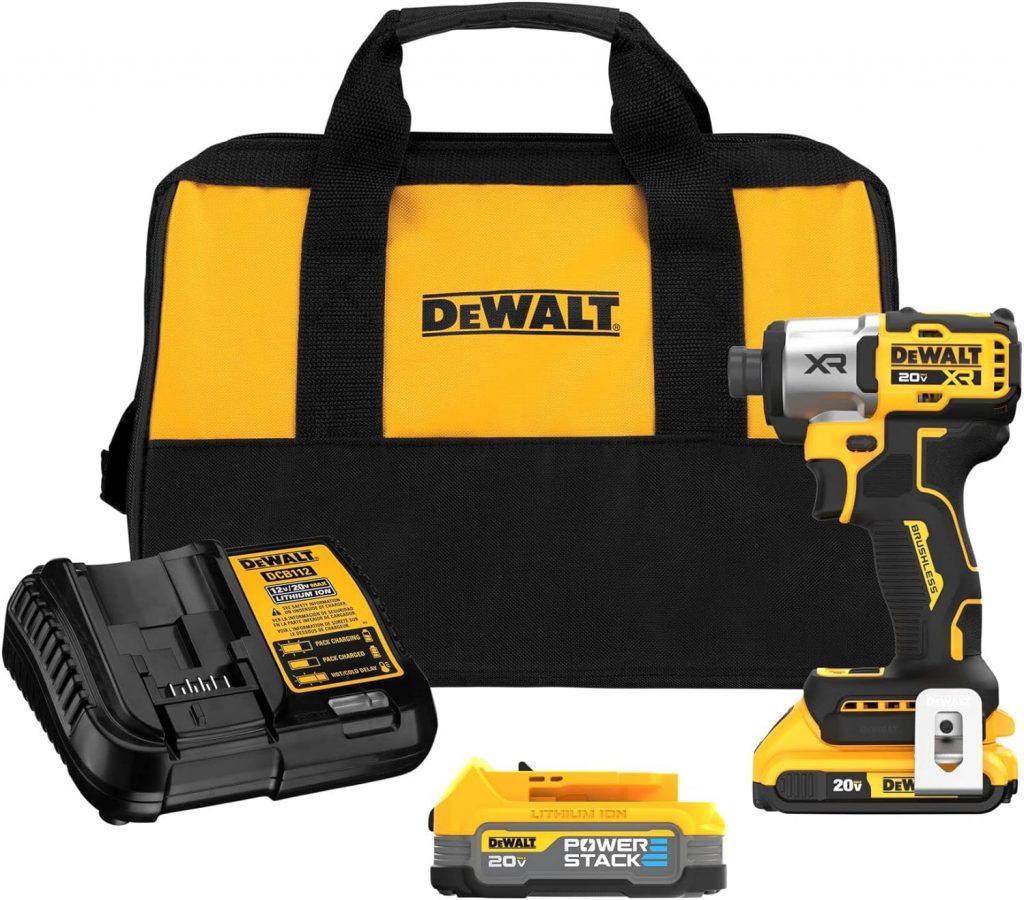
This DEWALT 20V MAX Impact Driver ticks all the boxes with brushless technology, Lithium Ion battery and a standard charger all included. This kit is brushless so more durable and efficient which is what you need from a screw/impact driver due to its regular use and with DeWalt turning 100 in 2024 you’re getting a brand you can count on.
3) Battery driven brushless circular hand saw: $200 – 250
Like a screwdriver if you primary working material is wood you will find the need to use a circular saw all the time, combined with a speed square you can work quickly and very accurately with your cuts which is great when framing for example. Speed squares don’t cost much and they basically give you a mobile fence to butt your saw and wood against while cutting to give nice straight cuts.
Get a circular saw with a brushless motor (for the same reasons mentioned above) where you can set the cutting depth of the blade as well as the ability to change the cutting angle (normally referred to as “bevel capacity”), this can be really useful for joinery/notching where you need to cut a certain depth or angle in-order to join two pieces of wood.
Then the absolute best tip for circular saws & saws in general is buy branded, high quality saw blades and change them as soon as the cuts become hard work and you’re almost having to wrestle the saw through the wood. A sharp blade should willingly go through the material unless you’re working with a particularly hard type of wood. As soon as your blade looses sharpness you’ll be wasting battery power, increasing the chances of kick back and your cuts will become unclean & rip the wood instead!
To work most efficiently I’d only recommend a battery powered circular saw to avoid the hassle of dragging around a wire and giving you the option to easily work outside which is something I’ve done a lot, for example when I built our hen house.
Again DeWalt offer a great option in their 20v Max series with the brushless DEWALT 20V MAX Circular Saw and an added bonus if you decided to buy this saw with the impact driver above you could share the batteries and charger between both driver and saw although as I mentioned it’s ideal to have at least 2 batteries.
4) Corded Miter saw: $100 – 800
While you can get good accuracy with a circular hand saw and a speed square you can’t beat the ease & accuracy of a miter saw. A miter saw is a stationary tool that has a fixed fence that you butt your wood tightly against and then pull down the saw giving nice straight cuts.
You can also adjust the cutting angle and on most saws you can tilt the saw blade at least in 1 direction (compound) as well (some are duel-compound which means them tilt both left and right) which is almost essential when doing window trim or crown moulding or finishing carpentry. A duel-compound makes things easier but you can absolutely get by with a compound only by moving your work piece rather than the saw.
A sliding compound (arm) miter saw has sliding arm so you are able to pull the saw out & in when cutting, what this means is you can cut wider pieces of wood as well as allowing you to “score” you cut line before making the cut to prevent tear out (rough cuts). This is a very useful feature but it isn’t available on a lot of budget saws and getting a saw with a sliding arm can double or triple the price so it depends a lot on what you will use your miter for. If it’s just for finishing like window trim or floor boards you should get a long fine without this but if for example you’re going to cut wider floorboards you’ll probably find the saw blade can’t reach wider enough to cut the full width of the board. You can get around this by flipping the board over and cutting twice but then you run the risk of uneven cuts.
A lot of miter saws now come with a laser to mark the cut line, I don’t have this on mine but on my next saw I’m hoping to get one with a laser cut line indicator to save time when lining the saw blade with my pencil marks.
A miter saw stand can be useful so you are standing when you cut but you can 100% get along fine just placing the saw on the floor or an existing table. If you’re going to be cutting long pieces of wood you can get “rollers” to support the wood better while you cut.
You can get battery powered meter saws now but in all honesty as a DIYer I don’t think you really need them, most the time you’ll create a work area, plug into electrics and then bring your wood to the saw to cut. If you were a professional working on job sites then I 100% see how a battery powered miter saw would be useful. With a miter saw you can actually get away with corded option since being mobile isn’t really a consideration (it’s not a tool you walk around with) and there’s a limit to the size of wood you can physically & safely get onto the saw so power within reason is less of a consideration.
Like with a circular saw or any saw really keep an eye on your blade and as soon as your cuts start to look ripped, replace the blade with a branded high quality blade. On a miter saw you might not notice that it’s harder work to cut but you might notice more friction when cutting and this can actually be potentially dangerous if the wood moves and flips out of place AKA kick back!
Given the large budget range here I don’t have a single miter saw I’d recommend so here’s a few at different ends of the budget range for consideration:
Big budget
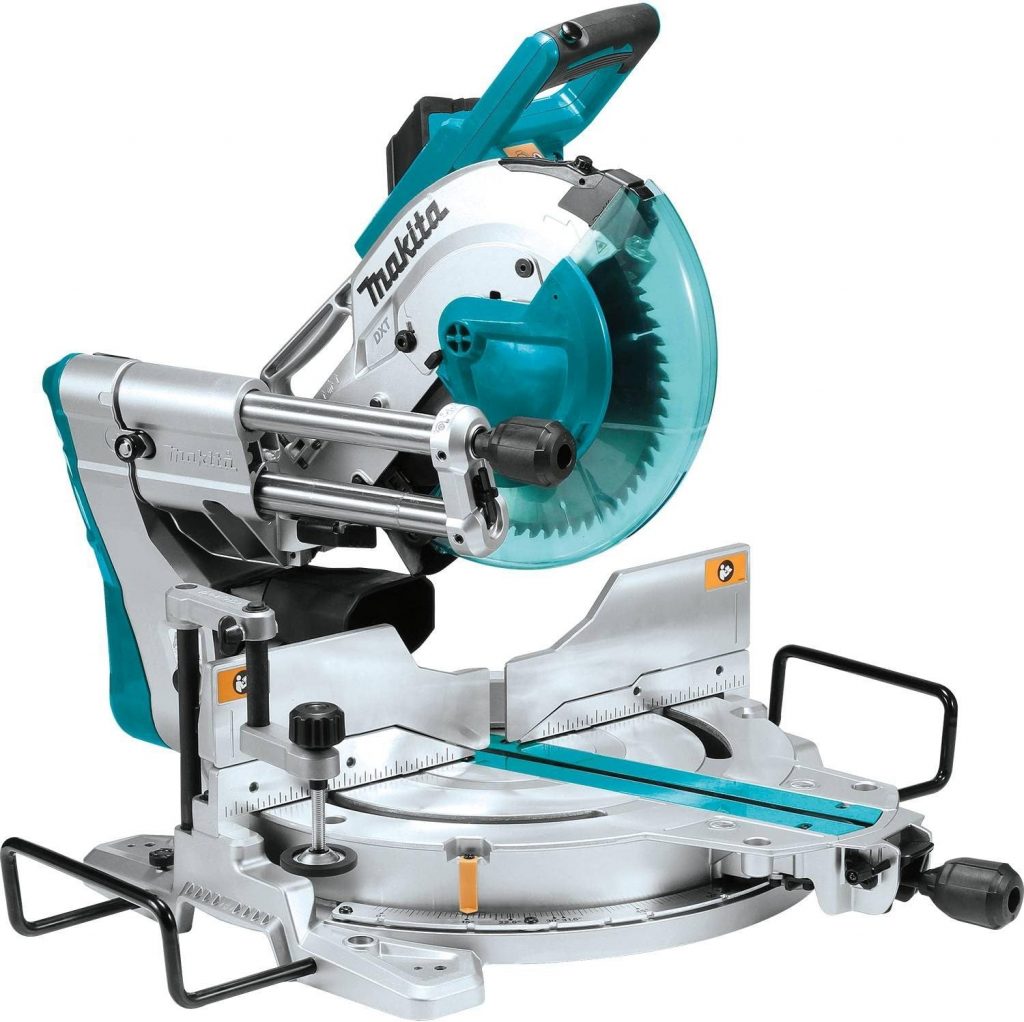
Big budget: If you did want to go “all in” at the upper end of the budget the Makita LS1019L 10″ Dual-Bevel Sliding Compound Miter Saw ticks all the things I’ve mentioned above. It’s a corded dual sliding compound miter saw meaning you’ll be able to cut wider pieces of wood & tilt both left and right, it also has a laser which is as mentioned a useful feature to have.
Great value

Great value: Somewhere in the middle of the budget range is the Skil 10″ Dual Bevel Sliding Compound Miter Saw, it is a lesser known brand but around half the price of the Makita. It has all the essentials including dual-compound and sliding arm and this package comes with a stand making it excellent value for money.
Rock bottom budget
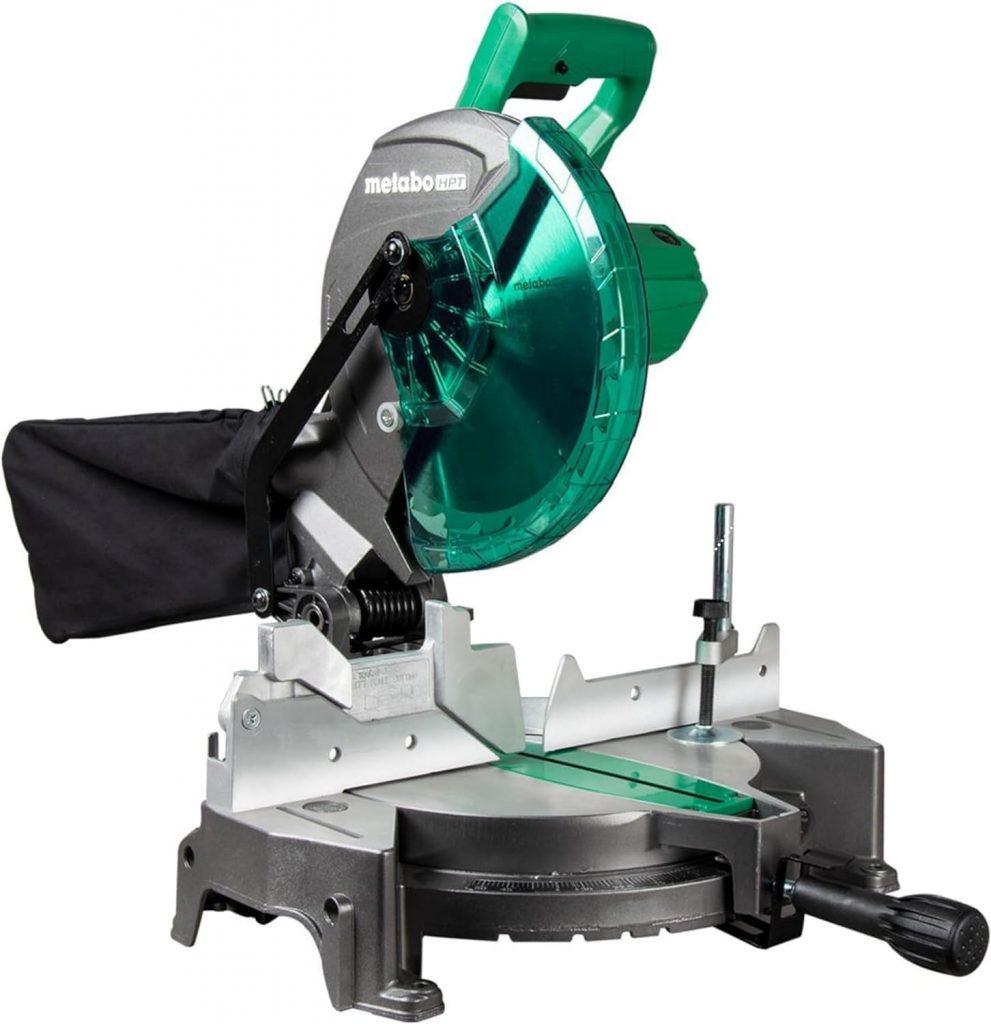
Rock bottom budget: If you’re budget is really tight you can still get a basic miter saw for $100-150 but it’s highly unlikely to have the sliding arm (which for me is a really important feature) or dual compound (less important) features but for basic finishing it should get the job done.
5) Oscillating saw: $80-120
When you first see an Oscillating saw you might wonder what the hell it might be useful for, it’s a funny type of saw with interchangeable attachments but if you ever need to cut in a tight corner, straight into wood or area where you simply can’t get another type of saw into then they are worth their weight in gold!
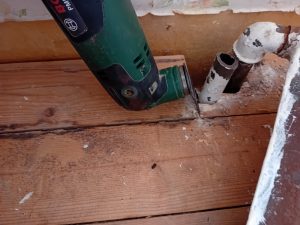
An Oscillating saw basically vibrates very quickly to make the blade or attachment move side to side in order to cut. You can buy wood blades and blades for cutting metal & other materials, sanding attachments and even paint removing attachments. Again keep your attachments in good nick for best efficiency.
You primarily use an Oscillating saw to cut finer & thinner wood since the blades are small, cutting straight lines with one is very tricky but you can use scrap bits of wood as a guide to saw a long to help.
Ideally if you have the budget get battery powered Oscillating saw because as I mentioned you’ll probably use it in tight areas where you want to be as mobile as possible. I’ve got by with a corded one but when the time comes to replace it I’ll be getting a battery powered one.
Last note on Oscillating saws, like with any saw, hitting a nail or screw in the wood is bad news, with larger saw blades you’ll often “get away with it” but with an Oscillating saw with a wood blade if you hit a nail or screw while sawing the blades are often completely useless afterwards and branded saw blades can be quite expensive. If you not using newly bought wood always check the wood for old nails and screws!
BONUS: Power Tool Combo Kits: $500-800
Power tool bundles or kits are now more and more available at very good prices if you shop around, basically it’s a bundle of selected power tools (normally always includes a circular saw and screw driver) with batteries & charger. Saves you having to buy everything separately if you’re sure you’ll need 70-80% of the tools included.
Make sure you pick a well-known brand with brushless motors so the tools last and by getting batteries & charger included you’re making any future tools you buy from the same brand cheaper because you won’t need to buy batteries for them. I’ve noted before A LOT of power tools do not come with batteries included so always read the product descriptions so you don’t end up with a tool you can’t power up!

The BOSCH Professional GXL18V-701B25 18V Tool Combo Kit is great little kit which includes 7 tools, 2 batteries (!) and a charger.At around $700 (at the time of writing) for the kit you’re getting 7 tools (if you include the LED light) including batteries for about $100 each which is great value.
Bosch is a well-known brand and Bosch’s Professional range of tools perform really well & are durable.
I own Bosch tools myself: a corded standard oscillating saw which despite it’s budget price is still going strong after many year of use and a Professional tiger saw, I don’t have a huge need for this so don’t use it much but it’s incredibly powerful and can basically saw through anything! It recently made short work of sawing through some old steel water pipes I had to remove in our house!
If I was starting out again from scratch I would definitely consider the BOSCH Professional GXL18V-701B25 18V Tool Combo Kit.
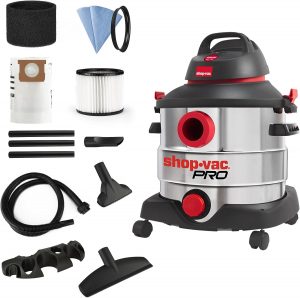
6) A work hoover: $100 – 150
My wife is going to be happy I’m including a hoover in this list and you might wonder why I’m including a hoover in a must have tools for beginners list so I better explain. Like it or not, DIY makes mess: sawdust, wood chipping, old nails and general dust. After I long day there’s nothing worse than then having to “tidy up” your mess but having a decent work hoover definitely makes it a bit easier especially if you keep on top of things throughout the day.
Before we lived in our house I was awful at tidying up and left mountains of sawdust & cuttings on the floor in the hope it might somehow tidy itself up which it of course it never did, part of this was down to laziness/tiredness but also because we didn’t have a decent work hoover. The hoover was had lacked power, got blocked constantly and made the highly unrewarding job of tidying up even more unrewarding.
We’ve gone through a number of work hoovers and even rented one but I’ve now settled on a work hoover from Einhell (a German brand mainly available in the EU) which has decent power, gets blocked way less than other hoovers we’ve tried, can hoover both water & dry material, has an auto setting so can be connected to corded power tools to hoover as you cut/work and it can be run with or without a bag.
Shop-Vac offer an 8 Gallon Wet/Dry Stainless Steel Vacuum which exactly the same spec minus the auto setting:
Hoovering up still isn’t my favourite thing but having a good work hoover at least makes things a bit easier!
7) Protective gear:
When we started the renovation I was so slack with protective gear and on a number of occasions I paid or nearly paid for it so i can’t emphasise the importance of getting good protective gear and don’t ever skip it, that one time you skip it might be that one time something happens. The way I look at it, if I always have the right protective gear on and something does happen then at least I won’t spend the rest of my life with whatever injury may have occurred thinking what an idiot I was for not wearing protective gear!!

Good news, for you’re standard DIY projects (ie. not clearing dangerous materials or chemicals) you don’t need so many things, most are well priced and last:
Hearing protection: $30-50
Yep I skipped this for most of the first year of renovation and yep now I have tinnitus which comes and goes. Hearing protection doesn’t cost much or even just ear plugs or noise cancelling headphones are better than nothing. A pretty standard pair of CE marked hearing protection combine with ear plugs can give you all you need when using power tools and I’m yet to find a power tool that doesn’t come with an ear splitting sound!
Eye protection: $30-50
As important if not more important than hearing protection is getting a good pair of goggles or protective glasses, it doesn’t take much to damage an eye for good but it also doesn’t take much to slip on some eye protection. I’ve had wood fly into my eyes before even with protective glasses on so I prefer to wear goggle although they have a tendency to stream up if it’s warm and are more uncomfortable in my view.
FFP3 dust mask or half mask: $30-50
Yes I know the whole World is sick of masks after the last few years but certain DIY jobs will require you to have a mask on hand. For standard DIY projects like insulating (even with the eco-friendly insulation we use I wear a mask), any demolition work and even cutting some types of wood it’s recommended to wear a mask to protect your lungs.
Rather than disposable masks which do offer good protection if FFP3 standard I recommend getting a “half mask” with replaceable filters, this way you keep & clean the mask part and just replace the filters as soon as you feel like it’s getting heavier to breathe. Replaceable filters cost around $20-40 for a pack of 8-10 depending where you buy them from.
If you want to use disposable as I said masks just make sure they’re FFP3 standard to give you the most protection.
Footwear: $100-150
Having dropped a cast iron radiator on my foot while wearing just trainers I can highly recommend getting a decent pair of work boots ideally with steal toecaps!! The radiator incident was up there as probably the most painful thing I’ve ever experienced and still hurts today if I tweak it again.
I now have a great pair of work shoes now which have steal toecaps, nail proof soles and quick release fasteners, only downside to steal toecaps is they are a bit heavier than standard boots and pretty rigid so after a long day with them on my feet can be a bit sore.
So there you have what I believe is a budget friendly beginner tool kit and some protective extras. There are of course many other tools which can make life easier (sanders, routers, nail guns and more) but this is my budget friendly beginner tools list.
NOTE: The price estimates are just ballpark figures which if you do or don’t shop around may vary.
Some links in this post are affiliate links which means I can earn a commission if my recommendations result in you buying a product. I only ever recommend products I’ve used myself or that have comparable specs to products I’ve used and all commissions help support this blog and in part our renovation too.